Since september, I was focused on my graduation project. I was working with my two friends and one of the topics was classification of data. We have to recognize gestures from data which was comming from gloves equiped with accelerometer and magnetometer sensors.
There are several methods to handle that kind of problem: Dynamic Time Warping, Hidden Markov Models and neural networks. We decided to use LSTMs (Long Short Time Memory) - special type of recurent neural networks which is current "state of the art" for classification problems. That solution was introduced in 1997 by Sepp Hochreiter and Jürgen Schmidhuber (paper) and thanks to many succesful applications in that field becomes very popular.
Our application was written in C#. We was looking for framework which can be easily integrated, supports training on GPUs and of course allows to create LSTM networks. We found CNTK which is deep learning, open source framework developed by Microsoft. It is written in C++ and provides wrapping library for evaluation models in C#. It allows to build generic network model using SimpleNetworkBuilder, which is good entry point for beginners.
Some links related to LSTMs, classification:
http://karpathy.github.io/2015/05/21/rnn-effectiveness/
https://colah.github.io/posts/2015-08-Understanding-LSTMs/
http://people.idsia.ch/~juergen/tpami_2008.pdf
http://www.cs.ucr.edu/~eamonn/DTW_myths.pdf
poniedziałek, 2 stycznia 2017

wtorek, 1 listopada 2016
openSUSE Tumbleweed - grub2 installed in non-EFI mode
Last time after I've installed openSUSE Tumbleweed, I've got incorrect grub2 installation (but system instalation was successful). Instead of using EFI my grub2 was configured to run in the classic mode. After reboot I was able to see only the grub2 command line.
Here is the solution:
First we need to find our grub config file. We can do it using:
To boot press F10.
After your OS is loaded open YaST, then go to Bootloader settings and change mode to "GRUB2 EFI". Done!
Here is the solution:
First we need to find our grub config file. We can do it using:
> search.file /boot/grub2/grub.cfg
(hd1,gpt6)
> configfile (hd1,gpt6)/boot/grub2/grub.cfg
To boot press F10.
After your OS is loaded open YaST, then go to Bootloader settings and change mode to "GRUB2 EFI". Done!
środa, 14 września 2016
LibreOffice conference 2016 - Brno

This year again I had the pleasure to attend in the annual LibreOffice conference. This time it was organized in Brno, Czech Republic on September 7-9th 2016.
The conference was very well organized. The conference venue was located in the modern campus of the Faculty of Information Technology at the Brno University of Technology. Every day we listened talks and participated in events on evenings. It was a good opportunity to meet my mentors and other GSoC students. One of the best things is that you can find out who is behind well known IRC nick :)
First day started with opening session and presentation of the state of the project. That day we also took part in HackNight - hacking together in the Red Hat office. My short talk was on the last day of the conference. There was a GSoC panel where we were able to present our projects. At the end we went sightseeing Brno.
I would like to thank sponsors, The Document Foundation and all organizers for a great event.
We also found out where will be organized next meeting.

See you next year in Rome!
piątek, 19 sierpnia 2016
GSoC 2016 - Infrastructure for defining toolbars via .ui (Glade) files - Final report
My all commits can be found here: https://cgit.freedesktop.org/libreoffice/core/log/?qt=author&q=eszkadev%40gmail.com
Done:
Not finished:
Tasks from my proposal
Done:
- Loading of different toolbar definitions in the Writer, Calc and Impress
- NotebookBar and Classic mode switching
- Mechanism to show/hide widgets depending on the context
- Priorities for widgets to allow dynamic hiding according to screen size
- Improved look of various widgets for their presentation in the toolbar
Not finished:
- Mechanism to add new tabs for the extensions
- Mechanism to customize the toolbar
Main changes
- Controls converted to be used outside sidebar:
- Possibility to change icon size in the Sidebar and Notebookbar [commit] [commit]
- Sidebar panels converted to single widgets:
- Container with widget priorities [commit]
- widget groups are collapsed when there is no enough space, user can access them from a dropdown menu
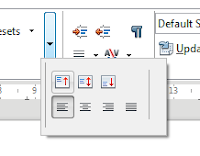
- Multiple Notebookbar implementations [commit]
- user can switch to other view using menubar

- Toolbar modes - tdf#101249 [commit]
- User can switch between different modes: default, single toolbar, sidebar and notebookbar
- Created custom widgets for better look:


niedziela, 10 lipca 2016
The environment to program AVR microcontrollers on Windows
I've tested a lot of tools which can be used to develop systems based on AVRs and finally found something ideal for me.
My setup:
WinAVR is a pack of needed apps: compiler (avr-gcc) and programming tool (avrdude). We should install it first. As an IDE I use Eclipse. The advantage of Eclipse is that I can share the same project on Windows and Linux. It supports my low-cost programmer - USBasp and I can easily change fuse bits clicking in the GUI:

To intall AVR plugin follow this tutorial.
On newer versions of Windows you can met problem with avr-gcc (error 0xc0000142):

To fix this issue you have to download fixed dll and copy to (WinAVR PATH)\utils\bin.
The last step is to add programmer in Eclipse to the AVR properties. To create new AVR project click New Project > C Project > AVR Cross Target Application > Empty Project and then set your MCU type, frequency etc.
To install USBasp in Windows the driver is needed: http://zadig.akeo.ie/. You have to choose "libusb-win32" in the driver field.
- WinAVR
- Eclipse with AVR plugin
WinAVR is a pack of needed apps: compiler (avr-gcc) and programming tool (avrdude). We should install it first. As an IDE I use Eclipse. The advantage of Eclipse is that I can share the same project on Windows and Linux. It supports my low-cost programmer - USBasp and I can easily change fuse bits clicking in the GUI:

To intall AVR plugin follow this tutorial.
On newer versions of Windows you can met problem with avr-gcc (error 0xc0000142):

To fix this issue you have to download fixed dll and copy to (WinAVR PATH)\utils\bin.
The last step is to add programmer in Eclipse to the AVR properties. To create new AVR project click New Project > C Project > AVR Cross Target Application > Empty Project and then set your MCU type, frequency etc.
To install USBasp in Windows the driver is needed: http://zadig.akeo.ie/. You have to choose "libusb-win32" in the driver field.
niedziela, 3 lipca 2016
Android - how to communicate with PC using serial port over bluetooth
One time I needed to simulate a device which communicates with PC over bluetooth. I thought that I can use my smartphone with Android because this is faster way than creating new device using microcontroler and bluetooth module. I needed only my phone, Android Studio and a USB cable.
I used code from Bluetooth Android Guide.
The most important line is:
Where base UUID is "00000000-0000-1000-8000-00805F9B34FB" and 0x1101 is the UUID of "SerialPort" service class. You can check service classes here.
After uploading application to the device and running application, you have to pair your phone with a PC. Sometimes COM port (on Windows) is binded just after pairing, but often you must do it manually. To do this you have to open bluetooth settings.

Then go to the "COM Ports" tab and click "Add". Select outgoing type and also your device from listbox. You should also see your application name below.

Click OK and you should get your COM port number.

The most important line is:
tmp = mBluetoothAdapter.listenUsingRfcommWithServiceRecord(NAME, MY_UUID);UUID.fromString(00001101-0000-1000-8000-00805F9B34FB)Where base UUID is "00000000-0000-1000-8000-00805F9B34FB" and 0x1101 is the UUID of "SerialPort" service class. You can check service classes here.
After uploading application to the device and running application, you have to pair your phone with a PC. Sometimes COM port (on Windows) is binded just after pairing, but often you must do it manually. To do this you have to open bluetooth settings.

Then go to the "COM Ports" tab and click "Add". Select outgoing type and also your device from listbox. You should also see your application name below.

Click OK and you should get your COM port number.

sobota, 2 lipca 2016
Windows 10
For many years my main operating system is Linux (currently openSUSE) but I also have installed Windows because sometimes I have to run or develop some native Windows apps. Some time ago I updated my Windows 8 to newer version - Windows 10.
Update was finished without any problems and after 3-4 hours I saw my new desktop. I'm rather a user who keeps opened a lot of windows simultanusely and for me the most important new feature is the support of multiple desktops:

I was using this in my Gnome desktop for a long time and one thing what is missing for me in the Windows implementation is a possibility to move window between desktops using a shortcut (or I missed this in the shortcut list). Nevertheless, the work on Windows isn't as much painful for me finally.
I also noticed one regression in sense of usability. Developers changed power management popup (shown after click on the battery tray icon) and now it is less functional:


I often switch between balanced and high performance modes, but now I can turn on/off only power-saving mode. To run high performance mode I have to click few times more (open power settings). This is the reason why I created shortcut on my desktop switching to the high performance mode:
Where GUID is one from the list:

Update was finished without any problems and after 3-4 hours I saw my new desktop. I'm rather a user who keeps opened a lot of windows simultanusely and for me the most important new feature is the support of multiple desktops:
I was using this in my Gnome desktop for a long time and one thing what is missing for me in the Windows implementation is a possibility to move window between desktops using a shortcut (or I missed this in the shortcut list). Nevertheless, the work on Windows isn't as much painful for me finally.
I also noticed one regression in sense of usability. Developers changed power management popup (shown after click on the battery tray icon) and now it is less functional:

I often switch between balanced and high performance modes, but now I can turn on/off only power-saving mode. To run high performance mode I have to click few times more (open power settings). This is the reason why I created shortcut on my desktop switching to the high performance mode:
powercfg.exe /setactive GUIDWhere GUID is one from the list:
powercfg -LIST
Subskrybuj:
Posty (Atom)